Simones cake creations

Simones cake creations
Rainbow cake

Tuesday 13 December 2011

Robbies First Birthday

My beautiful baby boy Robbie turned 1 and I made a cake for his party, a 2 tier butter cake in blue fondant and a teddy sitting on a patchwork quilt on top... the fillling was chocolate butter cream. I baked late in the week so I had to wait until the day of his party to fondant and put together the tiers of the cake, as a rule it is preferable to let the cake sit for a day so the cake doesnt move when its put together. Luckily my mum and hubby were here to help with the prep for the party and get the 4 kids ready, while I caked. So I got up early, and started with the buttercream and the filling the layers with piped icing.  It was a fun job as who doesnt like icing at breakfast time?!!  the kids thought they were still dreaming!!

I wasnt entirely happy with the quilt effect but  it was a make it up as you go situation! i ended up choosing a few colors and over laying the coloured squares onto a white piece of rolled fondant. I was really freaked by my time constraints so next time i would also texturize around the squares to make them look more "quilty", I ended up cutting the rug at the ends to look like fringing. it really looked great and added stitching with light blue royal icing piped with a fine tip ....add some white fondant dots and a bow with some green stars... voila! i had never attempted a teddy bear before so i just started with some easy shapes like a round tummy, a little round head ...add some ears indented with a hand tool, detail like tummy patch eyes and nose were done with americolor black mixed with white spirit to dilute. the arms were sausage shapes with cut offs for teddy hands..hes pretty fat! it was a learning experience but i was really happy with it in the end... took 3 hours to do all up and that was at top gear as 30ish people were coming at 2pm and there was other party prep to do. Robbie loved his cake! Happy birthday spunky!


Saturday 26 November 2011

Baby Shower Cake

This cake was a different one, I had never done a nappy bottom cake before, and this one was a fun one to work out.... it was a 3 layer mud upon which another tier is placed which becomes the nappy bottom.
It was a cute cake and one that I worked out as I went along... as usual for me.....It was a mix of Fondant modelling which I drew on my sculpting skills and mud cake stacking skills.... It turned out to be a two Tier dressed up as sculpture really.  
So I took a 3 layer stack mud with chocolate ganache, and i fondanted with white and added polka dots in gelato colours.
I took the 2nd tier and carved the edges off so the nappy wouldnt have any sharp adges.  I added the white fondant nappy and 2 peachy fondant legs.... I did this off the cake and added it as a whole tier later.
I made 2 little feet and 10 little toes, adding them onto the cake after i positioned the nappy into the cake.
I added a yellow layer of fondant which looked like a shirt or dress,

All that wasleft to do was add more polka dots and the writing!
Some detail of the feet, 10 beautiful toes, and some creases added on the feet for authenticity.

this is the other side

 some pretty fondant ribbon and bows, makes it a lovely cake for a baby shower!

Friday 28 October 2011

The Butter Cream of my Life.....

I have a great butter cream recipe that looks fantastic on the cupcakes I do which keep their form , which for any cupcaker is paramount to a great cupcake. I have tried the Wiltons recipe and its great, but I dont like having to melt the copha to use in it.... ewww. SO I use the recipe I devised which is
250 grams butter, softened
4 cups of icing sugar
2 teaspoons of vanilla
2 tablespoons of milk
for chocolate butter cream add  3 to 4 tablespoons of chocolate ganache..... mmmm ganache.
To pipe the buttercream i use a big nozzle, lets not get too complicated, i wont go into sizes... just get a big one.... and swirl onto the cupcakes...  :)

Wednesday 26 October 2011

Happy birthday GRAGRA

Its my husbands birthday, and for his big day I am making a cake in the shape of his footy jersey, he's a mad keen Manly supporter! So here we go i have made a mud cake and cut it to shape, now for the tricky bit....... i have 3 hours to get it done!arrrgghh before he gets home. And how do you make maroon again? So I baked  2 mud cakes, cut one to shape and overlayed with maroon fondant and with a cleanskin jersey in mind... see below
white fondant stripes and a few shapes cut out for the detail.....white round collar....using a icing pen i did an eagle... voila! i layed it atop the lower layer that i had decorated (read smeared) time constraints people! 3 hrs!


it all worked out and Graham, my dear husband, was really surprised!

Tuesday 25 October 2011

Brown Cows 20 year Reunion!

Recently I went to my 20 year reunion , when we were at school we were known as the brown cows, as our lovely uniform was brown .... grrrross. I` didnt do much organising, i was more the friendly yes lady on the other end of the phone for a friend of mine who did a marvellous job putting it all together, and as per usual at the last minute I offered to make cupcakes for our alumni to enjoy, and also i wanted to reassure Kirsty that I was truly trying to help her... passively.
Any way i said, how about some cupcakes with our school colours and some cows heads on top?  Sounded good, but lets not forget that i have 4 kids and one of them is a baby and the other one has ADHD.  I have to say shit gets hectic in my house.... So anyway. I set about making 40 cupcakes, then I baked 40 mini cupcakes just for good measure....overkill is my favourite word! Also I think the closer I got to the day, the more nervous I became. So a baking I went!
I made a vanilla buttercream in what i call HELLO yellow, and then enlisted child labour in the form of my beautiful daughter Hailey to start making cows heads.... I literally dreamt of ways to make cows heads on the tops of these cupcakes.... so the morning of the reunion i was SET!

The cows head were made from brown chocolate fondant, cut into ovals then pink fondant cut into smaller ovals and layed onto the lower half.... a few little holes made for nostrils and a circle cutter indentation for a smile, two little dots in americolour black and VOILA!

the second set of cupcakes were made with chocolate butter cream and sprinkles, nothing too flash as minis are little and the piping itself serves as the embellishment....


they were LUSH and a huge hit Iused alot of icing that day and Lucky for me i had already fallen off the diet wagon! thats all for now,  thanks for reading! to follow, i blog my buttercream recipe, its awesome!

Wednesday 12 October 2011

So I have been busy in my absence......


it has been a while and I have to say the world went topsy turvy for a while, and never fear i am back ... and i have been caking along quite well in my absence.... i know you missed me like a Diarrhoea shower I'll bet... all two of you and thats no joke. My beautiful niece Katia turned 18 and i did a great 2 tier mud cake for her in turquiose and black with purple ... celebration was the theme as was coming of age .. so here is the result..alas i took no pics of the making process ...sorry!!!
Also I made a giant cupcake for a friends 40th and i went for cute yet sophisticated... with 24 mini cupcakes to go with it  in matching Pink and black....they gave me free reign with this one and this is what you get for letting me run free......


Saturday 27 August 2011

Dora Cake for Tia

Today I finished the Dora cake I was making for my daughters Third birthday, Tia is completely mad for Dora the Explorer so I set about making a Dora cake , rainbow butter cake inside with strawberry butter cream filling, I downloaded a pic from the Internet of a colouring in sheet of the wily explorer in question and set about making her likeness atop of the cake.

I cut out a negative image of Dora, totally in black and applied it to the cake, then I cut out the different components in colour blocks and stuck it to the black image and slowly filled her in with colour ,


As you can see it was very fiddly work and it took time and care to apply all the colour with a scalpel and a couple of different tools. I reccommend allowing the fondant to harden slightly before cutting out the components as the fondant stretches and is hard to work with when it is too soft.
the star detail was a star puch cutter and it was a very quick tool that made everything alot easier. 

In the end I used different techniques to lift the image like texture around the socks and shoe detail, around the backpack straps and collar, it gave it a three dimensional quality, 
I got the bright idea of putting a paint roller in her hand and have her painting a rainbow and stars across the cake! It was a good idea, very effective looking, but my hubby didn't like it.... oh well tuff.  I feel this cake had a good finish to it and was quite a good result, Tia is going to love it, it tasted good and has Dora on it.... thats all that counts to her!

Thursday 18 August 2011

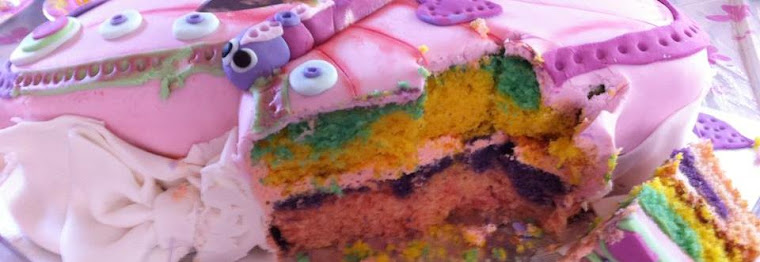
Rainbow cake.


I am making an angel cake for my Aunty Rita , for a white themed party, so its going to be a white fondanted cake and as a special surprise the cake inside is a rainbow cake. I have never made a rainbow cake  before so i made a quadruple batch of my butter pound cake and divided it into different bowls
then i lined a square tin with baking paper and very carefully layered the batter trying hard to keep the colours separated

the last layer was purple, Tia got to it and tipped in alot of red food colouring but i salvaged it and put it in last, starting from the middle and working out

There it is i think quite a successful looking cake, all the layers are still defined and the pink looks great, tomorrow i am attempting the angel exterior.

Thursday 14 July 2011

Killer Klown Cake

My most recent adventure in cake was the Killer Klown cake, based on the 1988 movie Killer Klowns from Outer Space. It was for my friend AJ's 40th birthday. His theme was the killer clown theme so My friend Tanya, sent me a small pic and asked me if I could make a Cake based on that picture.
As you can see i was quite an interesting subject , as alot of people i know have KLOWN ISSUES. I based the cake on the main figure in the foreground of the picture and set about drawing a template for the cake.  also to get my head around the design. then I baked a chocolate mud cake using a 4x1kg of Bakels mud mix, mixing each mud mux individually. I poured each mix into a greased and paper lined square tin that was 30 x 30 cm.120 degrees celsius. I baked it for 6 hours on cook it through without drying it out, it seems like a long time but it is over 6 kgs of cake including liquids added like eggs, water and oil. It is such a beautiful cake to eat, so dense but not dry or hard.
I let the cake cool and what I call cure for a day, then I usually find it has hardened enough to carve into. thats when the template comes in handy, it is great for marking out where you need to cut. I cut out the shape and then i slice the cake in half horizontally to make two layers and spread some dark chocolate ganache then replace the top layer. To the cakers out there it may seem a bit obvious but I'm sure someone was wondering....

I then place the template on top of cake and literally slice into the template to mark out where the facial features will go. It ends up looking like Gene Simmons...all angry. It was easy to get the proportions right this way.


 iended up dirty icing it with chocolate ganache, it was just easier at the time....i did white fondant for the face, then using the drawing i added cheeks out of red fondant...premade and mixed up pink for the lips, the hair was red fondant that i used a texture tool to create a fuzzy look.... although red pasmak (persian fairy floss ) would have been perfect. couldnt find it not sure if it exists in red either...Eyes were added and eyebrow ridges un white fondant

the nose was made from a ferrero rocher covered in red fondant and the mouth was filled with black premix fondant... its blacker than what i can mix up myself. the eyelashes were black fondant but i ended up changing them....they just werent evil enough.... so i got out my tequila and my colours and went to town painting up a storm....

The teeth cut out of white fondant and black food colourong blended with white spirits to dirty up the cake , the extra peices were all added with tylose glue and the eyecalls were painted with tylo to look glossy
add the green fondant that i ended up texturizing to look a bit crazy quilted and it was done. the fondant was pieced togther and the pleats were added later as rolls of fondant separate. 
xx
Monday 11 July 2011

Welcome to Simone Cake Creations, the Home of the Weird and Wonderful cake

Hi there, this is my first blog, drum roll please, and it is going to showcase my cakes I make and the way in which they are created, I take lots of pictures during the making process, and I think that someone out there will find it useful. I will start out by saying that I never intended to make cakes,  Cakes were the furthest thing from my mind and I have done no formal courses in cake decorating, but what I do have is a huge creative streak and the will to try anything. Thats got to be a good thing right?
  I have 4 kids, one of which is a 7 month old baby. I am a stay at home mum... my husband would choke if he read this because i am rarely at home.... but you get what I mean.I have been making Cakes for a relatively short time but I make some weird and wonderful ones! Anyhow, my sister rang me a few months back and asked me if I would help her with a cake project that would become known as OPERATION PENIS CAKE. A top secret operation that involed butter pound cake, chocolate butter cream and cointreu in the shape of a Huge Penis. Which was then fondanted and a hand made from LCM's attached to it with the words "to have and to hold" written across the huge scrotum...( eww first blog and i had to use the word scrotum already...mum would be proud!) I said, WHY ME? when she asked but it was such a scream to make with them that I decided to offer to make my Nieces 21st cake as a gift which was a 3 tier mudcake with leopard spots, the design of which I researched on the internet for ages. pics to follow...

So this Blog will show the ones i have done and the processes I go through during the making process, the baking, the filling, the design,